GENERAL
What health and safety protocols do I need to follow when I'm visiting the Y?
Do I need to show proof of vaccination?
Why can't I register for my class or pool?
What hours are you open?
What can my child do at the facility?
YMCA MEMBERSHIP
WHO CAN PARTICIPATE AT THE Y?
HOW CAN I JOIN THE Y?
HOW DO I GET A RECEIPT?
DOES THE Y OFFER INCOME BASED PRICING?
HOW DO I UPDATE MY PAYMENT METHODS?
HOW CAN I CANCEL MY MEMBERSHIP?
You will need to provide 30 days written notice to cancel or modify your membership for the following month. For additional assistance with your membership, please contact your home branch.
DOES IT MATTER WHICH Y BRANCH I JOIN?
When you join the Y of SF, you have access to all of our fitness facilities. You should join the branch you plan to visit most frequently, 50% of the time- your Home Branch. Your Home branch is the Y you’re registered as a member and regularly participate the majority of the time. If you are visiting another location more often than your home branch, we will assist you by transferring your membership to your new home branch. This may or may not change your membership fee.
CAN I REGISTER ONLINE FOR PROGRAMS AND CLASSES?
COMMUNITY PORTAL
WHAT IS THE COMMUNITY PORTAL AND HOW DO I LOG IN AND USE IT?
Our Community Portal is an online platform where you can access your account information as well as all of our virtual content.
- Access your membership profile
- Register for community and youth programs
- View billing information
- Access virtual programming
Part 1: How to Access Your Community Portal Account. Enjoy this 6-minute step-by-step instructional video on how to login, reset your password or create an account on our Community Portal.
Part 2: How to Use The Community Portal. Enjoy this 8-minute step-by-step instructional video of how to get the most use out of the Community Portal. Learn how to save your favorite classes for later access, place classes in your Outlook or Google calendar, and access recorded content are just some of the features you can use.
Click here to log into the community portal.
WHAT DO I DO IF I FORGOT MY PASSWORD?
After navigating to the gear icon on the top right hand corner of your screen and clicking "log in", click “Forgot Password” and follow the prompts to re-set.
HOW DO I ACCESS MY ACCOUNT ONLINE?
In the right-hand corner of your screen, just click Log In at the top-right of our website and you will have an option to login (you can also click here). From there you can access your profile. If you have logged into your account in the past, type in your email address and password. If you have never logged on before, follow the appropriate links at the bottom of the log-in page.
MOBILE APP & WEB REGISTRATION
HOW TO DOWNLOAD THE NEW APP
- Open the Google Play Store or Apple App Store on your mobile device.
- Type in the YMCA of Greater San Francisco in the search bar.
- Click the download button to install the app onto your device.
- Exit the app store and wait for the download to finish.
HOW TO GAIN ACCESS YOUR ACCOUNT
- Open the app and enter the email address associated with your membership account. (If you get an “invalid email” pop-up or doesn’t remember which email is associated with your membership account, a membership associate at your branch can assist you.)
- You’ll receive an email with a pin number - check your spam folder if you do not receive the email within a few minutes.
- Go back to the app and enter the pin number and create a password. (This same email and password combination can be used for the app and web-based reservation systems.)
LOGGING INTO THE WEB BASED RESERVATION SYSTEM
- Visit the Schedules page
- Click “Login to Make Reservations” on the top right of the schedules page.
- Enter the email address associated with your membership account. (If you get an “invalid email” pop-up or doesn’t remember which email is associated with your membership account, a membership associate at your branch can assist you.)
- If you have already set up password for the app, use the same password here. If not, you’ll receive an email with a pin number - check your spam folder if you do not receive the email within a few minutes.
- Return to the schedule page and enter the pin number provided and create a password.
RESETTING YOUR PASSWORD
- Enter your email associated with your membership account on the login screen.
- Click “Forgot Password.”
- You’ll receive an email with a pin number. Check your spam folder if you do not receive the email within a few minutes.
- Follow the link in the email and enter a new password and the pin number.
- Return to the app or reservation page and login with your new password.
PUSH NOTIFICATIONS
App Update Alerts
Using the most up-to-date version of the app ensures you get access to all the latest features as well as improvements and fixes.
Facility Notices
Receive notifications when your facility is closed or has different hours for maintenance, weather, holidays, special events, etc.
Reservation & Appointment Reminders
Get reminders about upcoming class, courts, and facility reservations as well as personal training appointments and more. You may also receive notifications about cancellations, location changes, etc.
Note: General push notifications for your facility are also visible in the alerts section of the app. You will always receive app alerts. Push notifications must be turned on and accepted (see below).
You will be prompted to allow push notifications the first time you launch the app. If you selected “don’t allow,” you may turn them on at any time in your device’s settings.
- Go to the device’s “Settings.”
- Click “Notifications.”
- Scroll down and click on the app.
- Swipe “Allow Notifications” on.
ACCESSING THE CLASS SCHEDULE
- Click the schedule icon in the footer (second icon from the left). The schedule is also available from the hamburger menu on the top left. Your app may also have a schedule icon at the top of the homepage.
- Select your location (if applicable) in the drop-down menu on the top right.
- Select preferred date. You’ll see a list of all classes on that date.
- Scroll through the list of classes on that day. You may also sort by class name, time or instructor in the search bar. The search will only show results for the date you have selected.
- Click on the class to see full class details.
MAKING A CLASS RESERVATION
- Click the schedule icon in the footer (second icon from the left). The schedule is also available from the hamburger menu on the top left. Your app may also have a schedule icon at the top of the homepage.
- Select your location (if applicable) in the drop-down menu on the top right.
- Select preferred date. You’ll see a list of all classes on that date.
- Scroll through the list of classes on that day to find your class. You may also sort by class name, time or instructor in the search bar. The search will only show results for the date you have selected.
- Click “Reserve.” The app shows how many spots are available. The “Reserve” button is also visible if you click on the class for full class details.
- If you have a household membership, select the member from your household who the reservation is for and complete the reservation.
RESERVING A TENNIS OR RAQUETBALL COURT IN THE APP
Please note: Presidio Tennis Membership is required to reserve tennis courts.
- Select “Reserve Courts” from the app homepage.
- Select location (Presidio for Tennis Courts, Marin for Racquetball courts) in the drop-down menu on the top right.
- Select your preferred date.
- Find the court you would like to reserve.
- Select the start time and duration. Please note - only available start times will be shown in the list of available times. Make sure you account for the duration of your reservation when selecting a start time. Example: if 12pm doesn’t show as available in the list of times to reserve then the court is reserved at that time so if you’d need to consider the duration and start time to book the slot before 12pm i.e. 60 minutes would need to start at 11am, 90 minutes at 10:30am etc.
- Click “Reserve.”
- Click “Accept.”
- If you have a household membership, select the member from your household who the reservation is for and complete the reservation.
CANCELLING A RESERVATION
- Click the “My Reservations” icon in the footer of the app. Your upcoming reservations are also visible on the homepage.
- Find the class or equipment and click “cancel.”
- Click “Yes, cancel reservation” to confirm your cancellation.
- You’ll see a pop-up confirming your cancellation with an option to make another reservation. Canceling your reservation automatically opens a spot for another member.
ACCESSING YOUR MEMBERSHIP BARCODE IN THE APP
- Open the YMCA of Greater San Francisco app.
- Click on the “Check In” button in the middle of the screen.
- If you have a household membership, you can swipe to view other family member barcodes for checking in.
YMCA360
What is YMCA360?
How to access YMCA360
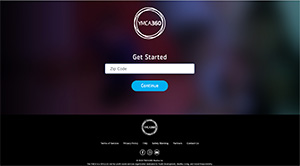
- Step 1: Visit ymca360.org and click 'Login/Sign Up'
- Step 2: Enter your zip code
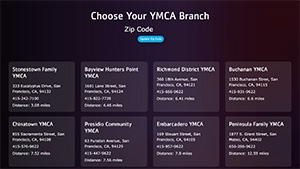
- Step 3: Select your branch location
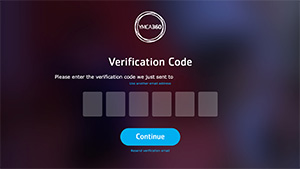
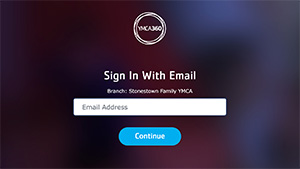
- Step 3: Enter your email address associated with your Community Portal account to get a verification code
- 5: Retrieve your verification code from your email and enter it.